🍽️ Press, Roll, Impress – Master Ravioli Like a Pro!
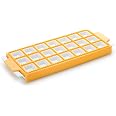
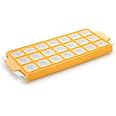
The Tescoma 630879.00 Ravioli Maker is a durable, anti-skid plastic mold designed to create 21 square ravioli at once. Dishwasher safe and recipe-included, it streamlines traditional Italian pasta making for home chefs seeking authentic, efficient results.
J**O
Small but effective
This is great and exactly vas advertised. When quarantine began, we got this to make little pierogie. It was smaller than I expected. Size was clearly mentioned, I just didn't pay attention. I used Itv with my pasta roller and made tons super quick. If you v want super small ravioli or pierogi, I highly recommend.
A**I
Very Happy with It
As other reviewers have mentioned, use abundant flour on the side of the dough that faces the mold. a pastry tube for the filling is indispensable and fast. I was worried about the plastic vs metal but no problems. Highly recommended!
C**R
Overall good ravioli mold that can be better if you ignore one part of the instructions.
I bought the square mold that makes 21 bite-size ravioli. I really wanted a metal mold but could not find one (in my price range) with the feature this mold can give, if you use it as directed below.The small ravioli molds that have a solid "well" in which to press the dough and then the filling have quite a limit in the amount of filling that can be used. If you overfill the well, the dough and filling will balloon upward around the rolling pin as you try to seal them up. With this mold, I found that, if I took the hard plastic yellow "top" off of the white base, the dough would stretch enough to hold a scant teaspoon of filling and wouldn't pillow up when I placed the top dough sheet on and used a rolling pin or small-diameter dowel to seal and "cut" the ravioli apart. I did have to be gentle with pressing on the yellow plastic part so that it did not bend too much under the pressure.Here's how I made ravioli using this mold: After making my dough, I used a KitchenAid pasta sheet attachment and rolled the bottom layer of dough one number thicker than the top dough sheet. I used #5 on the bottom and #6 on the top. This helped prevent the bottom dough sheet from tearing when the filling was placed and eventually pressed down. I generously floured the bottom side of the dough and then laid it over the two-part mold with both pieces together. With my fingers, I gently pressed the dough into each well. I then took the dough sheet and the yellow top piece off of the bottom piece and put them directly on my counter. Using a tiny cookie scoop for the filling, about 1 teaspoon's worth, I gently pressed each portion into the depressions in the dough. Once all the depressions were filled, I lightly spritzed the top dough sheet with water so that it would seal with the bottom sheet. (I find this easier than using a pastry brush or finger to wet the ravioli borders on the bottom sheet.) As I laid the top sheet down on the filled lower sheet, I carefully worked from the middle to the sides and pressed out air bubbles. Once the two sheets were smoothed, I used a rolling pin at a slight angle (nearly horizontal) to cut the outer edges of the mold frame. If I had a stubborn section that wouldn't separate easily, I pressed with the rolling pin parallel to the border and pulled the extra dough away. This ensured that the edge remained sealed. Once the excess dough was removed, I took a 1/2" round dowel (actually the handle of a large wooden spoon) and used it to press over the internal ravioli borders to create the zig-zag edges. I had to be very gentle with the plastic mold as it flexed under the pressure. I then flipped the mold upside down on parchment paper. Starting at one end, if the ravioli didn't just fall out, I gently loosened them from the short edge with my fingers. Usually, they would drop from the started edge onto the parchment paper still somewhat connected. I stretched the still-connected ravioli very gently so that the ravioli edges would be as thin as possible and then put them in the freezer. After freezing, the ravioli were usually easy to break apart. I moved the ravioli into zippered bags and froze in meal-size portions.I chose to keep this ravioli mold because it provides the size of ravioli that I want to make, what with the adaptation. The plastic parts, used together as intended, are reasonably sturdy for being plastic.
D**A
Easy to make ravioli eventually!
Just roll out the dough on it and stuff it with anything you like. Roll out another layer of pasta and press the border. Bunch of nice and neat small ravioli in few minutes.
J**N
Doesn’t work
Used it once and trashed it right after. Made of cheap plastic, it does not cut each individual ravioli and I had to manually press on each seem to even get a faint outline of where the tool should have cut and separated each ravioli.
K**R
Smaller than I realized
Makes smaller ravioli than I realized. Takes practice to get the amount of filling right
L**Y
Nice small mold
Great mold! Beware the ravioli mold is small but still a nice quality product.
K**E
Almost perfect
1. Really tiny. Added picture w/ quarter to give you better idea.2. I use good flour dusting on surface to prevent sticking.3. I use a paper towel, all wet, squeeze water completely out so it's just slightly moist and then gently push that in each cavity. No tears, dough keeps dent shape. Also, wet dough surface helps to close tight to top dough.4. After adding top, I flour dust top.5. Then I first roll all outer edges and remove overhang. Tip: angle your rolling pin slightly down outside makes cutting off overhang easier.6. I typically overfill just a tiny bit, so I don't roll all the way down the sheet. I roll only over the cut edges.General: Like the form, but 2 thinks could be improved. a) cutting rim 2 mm higher for cutting double sheet dough height. Maybe a one-sided chamfer for easier cut. b) Add a suction or weight to bottom of white base part. While rolling sometimes dish tilts under rolling pressure. Not udeal.Overall, easy to use and clean, even on my very first try.
Trustpilot
4 days ago
2 months ago